This Dr. Axe content is medically reviewed or fact checked to ensure factually accurate information.
With strict editorial sourcing guidelines, we only link to academic research institutions, reputable media sites and, when research is available, medically peer-reviewed studies. Note that the numbers in parentheses (1, 2, etc.) are clickable links to these studies.
The information in our articles is NOT intended to replace a one-on-one relationship with a qualified health care professional and is not intended as medical advice.
This article is based on scientific evidence, written by experts and fact checked by our trained editorial staff. Note that the numbers in parentheses (1, 2, etc.) are clickable links to medically peer-reviewed studies.
Our team includes licensed nutritionists and dietitians, certified health education specialists, as well as certified strength and conditioning specialists, personal trainers and corrective exercise specialists. Our team aims to be not only thorough with its research, but also objective and unbiased.
The information in our articles is NOT intended to replace a one-on-one relationship with a qualified health care professional and is not intended as medical advice.
How to Carve a Turkey: Step-by-Step Guide (Plus Recipes!)
November 28, 2024

Come November, people all over the U.S. who plan on hosting Thanksgiving for the first time may start panicking over all the preparation involved, including figuring out how to nail the perfect turkey. Want to know how to carve a turkey like a pro?
Below we summarize tips from various cooking experts on how to carve a turkey, including those related to using the best knives and for timing the turkey just right.
What you need
Is the turkey all cooked up and ready to be presented to your hungry crowd? Because carving a turkey can be a bit of a sloppy process, you probably want to handle carving it in the kitchen rather than at the dining table.
Before we get into how to carve a turkey, you need to make sure you have the proper tools.
Carving a turkey requires the following basic kitchen tools and equipment:
- A large carving board or cutting board. If possible, use a carving board with a moat around the edge to catch juices that leak out, making cleanup easier.
- A chef’s knife or slicing knife. A long, flexible knife is best, but some also choose to use an electric knife.
- A platter to serve the turkey on. While carving, you want a separate platter from the cutting board to place the pieces you’ve already cut.
- Tongs to serve with.
- For help carving and cleaning up, paper towels. The process tends to get a bit messy, and this prevents your hands from touching all the meat.
How to carve a turkey
How do you carve a turkey step by step? Here are directions for how to carve a turkey:
- Place the turkey on your carving board, and remove the string tying the legs together.
- Cut the legs and thighs first. Use the knife to cut through the skin and connective tissue that connects the legs to the body. You can wrap a paper towel around the leg so you can grip it with your hand while you pull it away from the breast. Try to guide your knife right around the thigh bone until it pops out.
- Place the legs and thighs on your platter. Later you’ll probably want to slice the thigh meat into thinner pieces on your cutting board once you’re finished carving the rest of the turkey breast.
- Remove the drumsticks next by cutting through the joints that connect them to the legs, and then place them on your platter. To do this, first turn the leg pieces over on your cutting board so the skin side is down, and then you’ll have a better view as you slice and pull them apart.
- Remove the wishbone before you cut into the breasts. First you’ll want to remove the wishbone located at the front of the turkey breast with your fingers by pulling it out. This is easier if you have the neck facing you and you cut an upside-down V in the flap of skin covering the neck.
- Cut into the breasts. The breastbone runs down the middle of the carcass. Use a long, flexible knife on one side of the breast as you slice down. Use your other hand to pull the meat away from the breast, and add it to your platter. You can slice it into smaller pieces by cutting against the grain. To do this, turn the breast skin-side up on your cutting board, and slice it. Repeat on both sides until all the meat is carved out.
- Remove the wings with your knife, and add to your platter.
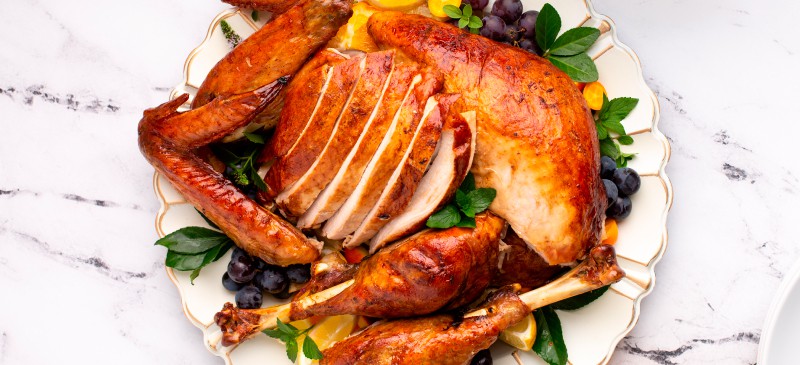
- Arrange the carved meat on your platter. Most people like to place the breast at the center and the drumsticks and dark meat around the slices breast. You may also want to add garnishes your plate, such as fresh herbs, sliced fruit or chiles.
When should you carve a turkey? How long does it need to rest after it’s been cooked?
It’s best to let your turkey rest for at least 15 to 30 minutes after you’ve cooked it before you start carving. This gives it time to cool a bit and also to absorb its juices that keep it moist.
(Struggling to figure out how long to cook the turkey for and which flavor enhancers such as herbs to add? Try this basic herbed turkey breast recipe.)
The amount of time your turkey needs to rest depends on its size. Larger turkeys should rest for longer than smaller ones, but overall you’ll want to give it at least 15 minutes (and ideally more like 30 or more).
After about 30 or 40 minutes you’ll want to serve it to your guests while it’s still warm.
What knife is used to carve a turkey?
This depends on which types of knives you have available. Some “experts” recommend using more than one type of knife if possible, since different cuts of meat may be easiest to slice neatly with different types of knives.
If you have them, plan to use a combination of a carving knife, a boning knife and a chef’s knife. These knives are thin, long and flexible, which makes them easy to maneuver when cutting meat away from bones.
If you don’t have many to choose from, use a sharp chef’s knife, which should be enough to handle the job if the turkey is cooked well and moist.
The sharper your knife is, the easier the process will be. A sharp knife can be especially helpful when cutting through skin without shredding it.
Can you carve a turkey before cooking?
It’s recommended that you always cook the turkey first before carving it. This helps make it juicier, prevents it from drying and falling apart, and also allows you to cut it into neater slices that make it tender and easier to chew.
Want another tip for making a moist turkey? Try making a dry brined turkey, which will come out extra tender and delicious thanks to the time it spends soaking in healthy and flavorful ingredients, such as citrus juices and herbs.

Precautions
How do you know that your turkey is cooked through, safe to eat and ready to be cut? You want to pay attention to the color of the meat and the internal temperature.
The deepest part of the thigh muscle is the very last part of the turkey to cook, so this is where you want to pay attention.
If you have a thermometer, check that the internal temperature is 180 degrees Fahrenheit by piercing the thigh. Also look for juices that run clear and not pink, which indicates that it’s cooked.
The meat should look very light pink or whitish but not very pink or red, which means it needs more time.
Turkey recipes (plus side dishes)
Now that you know how to carve a turkey and your turkey is plated to perfection, you’re ready to dig in. Remember that you don’t need to discard the bones and connective tissue, since these can be used to make stock and bone broth.
If you’d like to cut the other parts of the bird to use besides the meat, hold on to your carcass, two thigh bones and two wing tips in order to make stock. You can put these pieces into a large zip-top bag and freeze them, and then use them whenever you’re ready.
What should you do with your leftover turkey breast and other meat? Here are some healthy leftover turkey recipes, along with some crowd-pleasing side dishes:
- Curried Turkey Salad Recipe
- Paleo Turkey Wonton Soup Recipe
- Turkey Chili with Adzuki Beans Recipe
- Cranberry Sauce with Pecans Recipe
- Whipped Sweet Potatoes Recipe
- Hasselback Potatoes Recipe
- Gluten-Free Cornbread Stuffing
Conclusion
- Here’s a quick summary of how to carve a turkey breast: First remove the legs, thighs and drumsticks from the body. Then remove the wishbone, and start carving the breast. Next remove the wings, and then slice all the meat to your desired thickness. Arrange your platter, and serve.
- You’ll want to use one or more sharp knives, including a chef’s knife and boning knife. Long, flexible knives are best for removing the meat from the bones.
- Cook your turkey before carving it, and allow it to rest after it’s cooked for at least 15 to 30 minutes to keep it moist.
- Remember to keep the carcass and connective tissue to make homemade bone broth or stock.


